Step 13 - The Final Adjustment
 

But Wait, There's More!

You need to start your engine and check to see if all your connections are tight and are not leaking or rubbing. The following check list pertains to both supercharger and turbo applications.

  • Let the car idle for a couple of minutes and then shut down the engine.
  • If you notice any rough idle you may have a vacuum leak. Check to make sure the pipe hoses are tight.
  • Check the level of the power steering fluid and add power steering fluid if necessary. Check the fluid level again after first 20-30 miles. The power steering might feel a little bit "jerky" at first until all the air gets out of the fluid.
     
  • Did you refill your radiator fluid? Check the overflow tank now and after your first road test.
     
  • After your first test drive check the hose clamps for tightness and make sure the pipes are not rubbing on the hood. Some flexing in your Intercooler hoses is normal and required.

Idle Adjustment on Supercharger Applications

Your idle setting will most likely require adjusting. If you installed your supercharger you probably have already adjusted your idle control once before. You may experience some idle drop when you come to a stop. No problem, just need some fine tuning.

  • Bring the engine up to normal running temperature.
  • Jump the diagnostic terminal block at the Ten and Ground to diasable the factory computer. The engine will idle higher during this procedure.
  • On the stock throttle body, start with the idle screw out no more than about 3/4-1 turn.
  • Adjust the butterfly out until the idle is up to around 1000 RPM.
  • Remove the jumper, the engine will idle back down to maybe 6-700 RPM. We are looking to bring the idle up to around 8-900 RPM.
  • Test drive the car. You might want to take your jumper and screwdriver with you and pull into a parking lot for additional adjustment. This procedure will take 2 or 3 times to get right.
  • Keep using the butterfly adjustment, not the idle screw.
  • The 70 mm throttle body does not have a separate idle screw and uses the main butterfly instead. Adjust the idle the same as above.

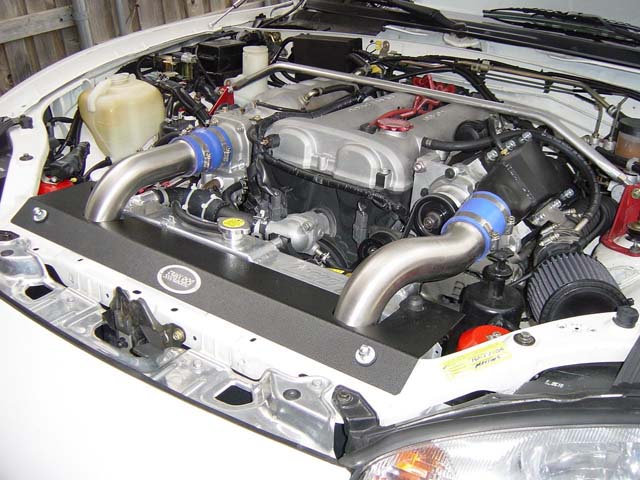
So What Do You Think?

It took a little bit of time, but you're done! Not only does the Track Dog Racing system look great, but it will also allow you to produce more power--and that's a great thing!

Heat causes detonation, and without the TDR Intercooler system you were probably generating close to 200° F or more into the intake of the engine. At those high intake temperatures you were required to reduce your timing to prevent detonation and rob yourself of horsepower. 

The outlet temperatures will now be closer to ambient, lower than your intake used to see when it was naturally aspirated.  We suggest you head for the dyno as soon as you can and work on your timing to bring your horsepower to higher and safer levels.  Because you are running much cooler air into the engine, fuel may need to be richened as well.  Consider running a smaller pulley on the supercharger if you have a good fuel management. There is power just waiting to be released!

If you would like a Track Dog Racing T-Shirt, please send back your old radiator support brackets as we will modify these for another customer.

Enjoy your new TDR Intercooler! If you have any questions please contact us at Track Dog Racing 214-340-9797 or email us at gary@trackdogracing.com.  If after hours or during your installation, call anytime on my cell at 214-280-6172. We appreciate your opinions.

Thanks for supporting Track Dog Racing and look for more innovative products in the future.

Back To Main Page


Step 1: Removal Of Factory Parts Step 8: Installing The Power Steering Cooler
Step 2: Installing The Radiator Brackets Step 9: Installing The Radiator
Step 3: Modifying The Radiator Cross Member Step 10: Installing The A/C Evaporator Coil To The Radiator
Step 4: Modifying The Evaporator Canister Step 11: Installing The Intercooler Pipes
Step 5: Installing The I/C Mounting Support Panels Step 12: Installing The Lower Radiator Panels
Step 6: Installing The Radiator Shroud Panels Step 13: The Final Adjustments
Step 7: Installing The Intercooler Main Page

©2004 Track Dog Racing™ All Rights Reserved